Here are some of the things I have done to some of my Allstar nodes.
I keep them here to help me when configuring nodes but maybe the notes can help you too.
I use both flavors of Allstar (Hamvoip and the original from allstarlink.org)
Hamvoip is a fork from the original Allstar program
[Some commands may be different]
Just click on the item and you should be brought to the bookmark below.
You’ll see how to setup:
-
- Wiring the Maxtrac
- Autopatch
- Changing courtesy tones
- Sip Phone
- Echolink
- Cron Jobs
- Hub Server
- All available commands
- Weather
- Simplex repeater
- GPS/APRS
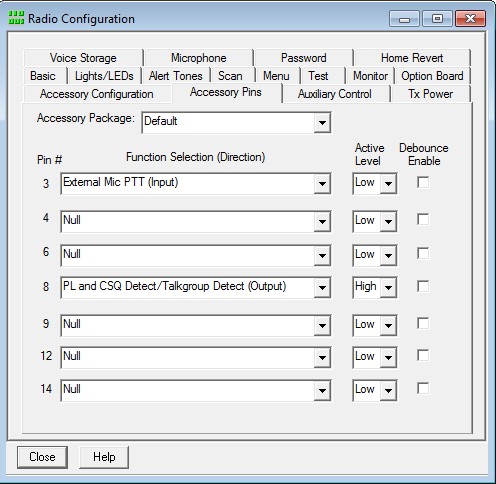
- Motorola CDM Configuration
- Check node is registering
- Disable hourly time announce
- Raspberry Pi Display
- Write Node Callsign Script
- RIM MAXTRAC RM – CDM
-
These are some tips to build your first node. Be sure to read through all the links on the Allstar (https://allstarlink.org/) site BEFORE you login. Because after login the menu changes and much (if not all) of the basic information goes away.
-
-
In order to become a member of the AllStar Link Network, you must first Register to become user of the Portal system. To qualify for membership, you must be a holder of a valid Amateur Radio license.
-
- Buy an Interface (some that I have used) URI , RIM , RIM Lite , ARIUSB, or a cheap USB sound FOB. Conversion Articles
- You can also get premade node interfaces at WB3DZZ
- Kits and premade nodes from Hamprojects.info
- Go on the Allstar web site. Request an ID, get it approved.
- Once approved make your ID a SysOp, add a server, request one or more nodes.
- Configure the server and assigned node(s).
- Boot the CD or SD and carefully follow the prompts. During the install you’ll download the web configuration to your node.
-
-
There is an Allstar Forum here Allstar Forum
-
There is an Allstar WiKi at http://wiki.allstarlink.org.
The HAMVOIP Email group is here
-
Please check there for the latest information.
-
-
-
Changing the SSH Port
-
Log in as root
-
cd /etc/ssh
-
nano sshd_config
-
Change to the desired port number
-
Use Control-O to save the file and then Control-X to exit the nano editor.
-
I then issued the shutdown -r now command for changes to take effect.
-
Don’t forget to change the port forwarding in your router to reflect the new port that needs to be forwarded to your node computer.
-
-
Changing Port for LS Nodes
-
nano /etc/httpd/conf/httpd.conf
-
Change Listen Port if needed.
-
systemctl restart httpd
-
WIRING THE MAXTRAC TO URI
Radius/Maxtrac series with 16 pin accessoryconnector – Simplex – Processed audioURI 20 – Radius 7 GROUNDURI 21 – Radius 11 RX AUDIOURI 22 – Radius 2 MIC AUDIOURI 1 – Radius 3 PTTURI 8 – Radius 8 (COR/CTCSS Det.)Radius Must be programmed to output COR/CTCSS det. onpin 8 of accessory connector, and JU551 in position ‘B’(de-emphasized audio out).I use Simple usb for the audio.I needed to change…carrierfrom=usb ; no,usb,usbinvert; no – no carrier detection at all; usb – from the COR line on the URI; usbinvert – from the inverted COR line on the modified USB sound fob
;noload=chan_sip.so
context=voipms ; Autopatch addon ; This is towards the bottom of the node stanza
6=autopatchup,context=voipms,noct=1,farenddisconnect=1,dialtime=20000,quiet=1 ; Autopatch up0=autopatchdn ; Autopatch down
[voipms]
;include => voipms-inbound
include => voipms-outbound;[voipms-inbound]
;exten => _X.,1,Ringing
;exten => _X.,n,Answer()
;exten => _X.,n,Rpt(41899|Rrpt/node:NODE:rpt/in-call:digits/0:PARKED|120) 75
;exten => _X.,n,Hangup; THIS IS FOR OUTGOING AUTOPATCH CALLS
[voipms-outbound]
exten => _1NXXNXXXXXX,1,Dial(SIP/${EXTEN}@voipms)
exten => _1NXXNXXXXXX,n,Hangup()
exten => _NXXNXXXXXX,1,Dial(SIP/1${EXTEN}@voipms)
exten => _NXXNXXXXXX,n,Hangup()
exten => _011.,1,Dial(SIP/${EXTEN}@voipms)
exten => _011.,n,Hangup()
exten => _00.,1,Dial(SIP/${EXTEN}@voipms)
exten => _00.,n,Hangup()
; SIP Configuration example for Asterisk;[general]context=default ; Default context for incoming callsallowoverlap=no ; Disable overlap dialing support. (Default is yes)bindport=5060 ; UDP Port to bind to (SIP standard port is 5060)bindaddr=0.0.0.0 ; IP address to bind to (0.0.0.0 binds to all)srvlookup=yes
register => XXXXXX:ZZZZZZZZ@newyork4.voip.ms:5060 ;Account and Password from provider
[voipms]
canreinvite=no
context=voipms
host=newyork4.voip.ms
secret=ZZZZZZZZ
type=peer
username=XXXXXX
disallow=all
allow=ulaw
allow=g729
fromuser=XXXXXX
trustrpid=yes
sendrpid=yes
insecure=invite
nat=yes
Link to pre-formatted list HERE
[telemetry]ct1=|t(350,0,100,2048)(500,0,100,2048)(660,0,100,2048)ct2=|t(660,880,150,2048)ct3=|t(440,0,150,4096)ct4=|t(550,0,150,2048)ct5=|t(660,0,150,2048)ct6=|t(880,0,150,2048)ct7=|t(660,440,150,2048)ct8=|t(700,1100,150,2048)ct12=|t(2175,0,75,2048)(1950,0,50,2048);TONE REMOTE SHORTremotetx=|t(1633,0,50,3000)(0,0,80,0)(1209,0,50,3000)remotemon=|t(1209,0,50,2048)cmdmode=|t(900,903,200,2048)functcomplete=|t(1000,0,100,2048)(0,0,100,0)(1000,0,100,2048)patchup=rpt/callproceedingpatchdown=rpt/callterminatedunlinkedct=ct1 ; local off-linktoneremotect=ct3 ; remote base connectedtonelinkunkeyct=ct8 ; remote on-link tone
SIP PHONE
I recently updated this information and put it on a separate page
erxgain=-3 ;Echolink receive gain adjustment in +/- db-volts. Used to balance Echolink recieve audio on an app_rpt node.etxgain=3 ;Echolink transmit gain adjustment in +/- db-volts. Used to balance Echolink transmit audio on an app_rpt node.eannmode=2; 0 = do not announce Echolink nodes at all; 1 = Say only node number on EchoLink connects; 2 = say phonetic call sign only on EchoLink connects; 3 = say phonetic call sign and node number on EchoLink connects
[el0]confmode=nocall=MY CALLSIGN -L ; Change this! Registered Callsign -L or -Rpwd=My Password ; Change this! Registered Passwordname=My Name ; Change this to your real name!qth=Location ; Change this to your actual QTH!email=My Email address ; Change this! Valid Email addressmaxstns=20 ; Maximum number of station that can connect to yourtcptimeout=10node=00000 ; Change this! Echolink Node Numberrecfile=/tmp/recorded.gsmastnode=XXXXX ; Change this to your active Allstar node number!context=radio-secureserver1=oceania.echolink.orgserver2=server2.echolink.orgserver3=server3.echolink.orgnaeast.echolink.orgnasouth.echolink.org;servers.echolink.org;backup.echolink.org; Change The following setting to your parameters;THIS IS FOR THE ECHOLINK STATUS PAGEfreq=145.400 ; Freq in MHztone=100.0 ; CTCSS Tone (0 for none)lat=40.7012345lon=-73.223457power=9 ;0=0W, 1=1W, 2=4W, 3=9W, 4=16W, 5=25W, 6=36W, 7=49W, 8=64W, 9=81W (Power in Watts)height=3 ;0=10′ ,1=20′,2=40′,3=80′ ,4=160′ ,5=320′ ,6=640′ ,7=1280′,8=2560′,9=5120′ (AMSL in Feet)gain=6 ;Gain in db (0-9)dir=0 ;0=omni,(Direction);deny=;permit=
Log in as roottype crontab -e
# Disconnect node 28183 at 19:55 Monday55 19 * * 1 /usr/sbin/asterisk -rx “rpt fun 28183 *76”
# Connect to *AB2M* ECHOLINK conference Mondays as 19:5656 19 * * 1 /usr/sbin/asterisk -rx “rpt fun 28183 *33088953”
# Disconnect node 28183 at 2230 Monday30 22 * * 1 /usr/sbin/asterisk -rx “rpt fun 28183 *76”
crontab -l (crontab space dash lower case L)
#00 0-23 * * * (source /usr/local/etc/allstar.env ; /usr/bin/nice -19 /usr/bin/perl /usr/local/sbin/saytime.pl $NODE1 > /dev/null)
00 0-23 * * * (source /usr/local/etc/allstar.env ; /usr/bin/nice -19 /usr/bin/perl /usr/local/sbin/saytime.pl 11795 $NODE1 > /dev/null)
[general]call = YOUR CALL-8 ; callsign (including SSID) for APRS purposespassword = XXXXX ; Password for APRS-IS server for above callsigncomment = AllStar Node XXXX ; Text to be displayed associated with this stationserver = rotate.aprs2.net ; APRS-IS server to report information toport = 14580 ; port on server to send datainterval = 600 ; Beacon interval in secondsicon = n ; A CAR (default) Icon yo be displayed;comport = /dev/ttyS0 ; Serial port for GPS receiver (specify this only if using GPS receiver);baudrate = 4800 ; Baud rate for GPS receiver (specify this only if using GPS receiver);debug = y ; set this for debug outputfreq=449.675 ; Display Frequency of stationtone=110.9 ; CTCSS tone of station (0.0 for none)lat=40.705879 ; Fixed (default) latitude in decimal degreeslon=-73.295885 ; Fixed (default) longitude in decimal degreeselev=10.5 ; Elevation of Antenna in Meters (*NOT* HAAT)power=4 ; Power level (see below)height=1 ; Antenna Height in HAAT (see below)gain=3 ; Antenna Gain (see below)dir=0 ; Antenna Direction (see below)
My SimpleUSB.conf file looks like this;
; SimpleUSB configuration
;
; Shown for two nodes. Second node commented out.
;
[general][usb]
eeprom=0
rxboost=1 ; 0 = 20db attenuator inserted, 1= 20db attenuator removed
; Set to 1 for additonal gain if using a low-level receiver output
carrierfrom=no ; no,usb,usbinvert
; no – no carrier detection at all
; usb – from the COR line on the modified USB sound fob
; usbinvert – from the inverted COR line on the modified USB sound fob
ctcssfrom=usb ; no,usb,usbinvert
; no – CTCSS decoding, system will be carrier squelch
; usb – CTCSS decoding using input from USB FOB
; usbinvert – from the inverted CTCSS line on the modified USB sound fob
invertptt=0 ; Invert PTT 0 = ground to transmit, 1 = open to transmit
; This is the collector lead of the 2n4401 on the modified
; usb sound fob.
; please refer to the howto for the procedure to do this.
; Only uncomment following two lines if necessary for your installation
plfilter=yes ; enable PL filter
;deemphasis=yes ; enable de-emphasis (input from discriminator)
;preemphasis=yes ; enable pre-emphasis (output to TX)
;rxaudiodelay=0 ; rx audio delay for squelch tail elimination. Valid values
; from 0-24 in 20ms increments. Typical values 5-10
; Uncomment and configure following lines for second USB node
;[usb1]
simpleusb_tune_usb.conf file looks like this[usb]; name=usb; devicenum=0devstr=1-1.5:1.0rxmixerset=75txmixaset=500txmixbset=500
rpt.conf file has this line for simpleusbrxchannel=SimpleUSB/usb
Interfaces
https://hamvoip.org/ARA%20Release.pdf
If you have an Allstar node you probably heard the node numbers when you connect or disconnect from nodes.
There’s simple script (by WA3DSP) that can convert the node number to callsign.
I found it very useful to keep tracking what’s going on when I connect to other nodes.
Download the script
First, download the script to your Allstar system by:wget http://hamvoip.org/downloads/write_node_callsigns.tar.gz
Extract it
Then extract the files:tar -zxvf write_node_callsigns.tar.gz
Launch for the first time to update the database
Write ./write_node_callsigns in the command line.
It’ll print on screen many lines, just let it finish.
If you get a permission denied, try typing chmod +x write_node_callsigns and run the script again.
Schedule it
Now we want to it run automatically to update all the new nodes.
So we type: crontab -e
Go to the end of the file and add the line:15 20 * * * ./write_node_callsignsThis will run the script every day at 20:15 pm.
Now save the file by CTRL+O and Enter to save and then CTRL+X to exit.
Helpful Links
Here are a few websites that I found that helped me along the way (More to come)
